Tabla de contenido
Publicidad
Idiomas disponibles
Idiomas disponibles
Enlaces rápidos
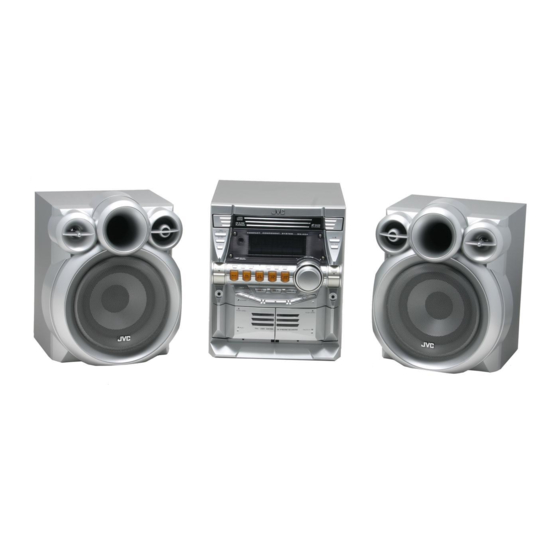
COMPACT COMPONENT SYSTEM
SISTEMAS DE COMPONENTES COMPACTOS
SISTEMA DE COMPONENTES COMPACTOS
MX-KC4
Consists of CA-MXKC4 and SP-MXKC4
Consiste de CA-MXKC4, y SP-MXKC4
Consiste em CA-MXKC4, e SP-MXKC4
CD
1
REPEAT
PROGRAM /RANDOM
SOUND
MODE
RHYTHM AX
STANDBY/ON
SLEEP
AUX
FM /AM
FM MODE
CD
CD
2
CD
3
TAPE
A
TAPE
B
VOLUME
FADE
MUTING
REMOTE CONTROL
SP-MXKC4
¡ATENCION!
Antes de operar su equipo, lea cuidadosamente este instructivo.
INSTRUCTIONS
MANUAL DE INSTRUCCIONES
INSTRUÇÕES
CA-MXKC4
SP-MXKC4
LVT1343-004A
[UW]
Publicidad
Tabla de contenido
Solución de problemas

Manuales relacionados para JVC MX-KC4


Resumen de contenidos para JVC MX-KC4
- Página 1 COMPACT COMPONENT SYSTEM SISTEMAS DE COMPONENTES COMPACTOS SISTEMA DE COMPONENTES COMPACTOS MX-KC4 Consists of CA-MXKC4 and SP-MXKC4 Consiste de CA-MXKC4, y SP-MXKC4 Consiste em CA-MXKC4, e SP-MXKC4 STANDBY/ON SLEEP FM /AM FM MODE REPEAT PROGRAM /RANDOM TAPE TAPE SOUND VOLUME...
- Página 2 Warnings, Cautions and Others Avisos, precauciones y otras notas Advertências, precauções e outras notas CAUTION –– % STANDBY/ON button ! CAUTION Disconnect the mains plug to shut the power off completely (all lamps To reduce the risk of electrical shocks, fire, etc.: and indications go off).
- Página 3 Caution: Proper Ventilation To avoid risk of electric shock and fire, and to prevent damage, locate the apparatus as follows: 1 Front: No obstructions and open spacing. 2 Sides/ Top/ Back: No obstructions should be placed in the areas shown by the dimensions below. 3 Bottom: Place on the level surface.
-
Página 4: Features
❏ The controls and operations have been redesigned to make them very easy to use, freeing you to just enjoy the music. • With JVC’s COMPU PLAY you can turn on the System and automatically start the Radio, Cassette Deck, or CD Player with a single touch. -
Página 5: Tabla De Contenido
Table of Contents Introduction ........................1 Features..............................1 How This Manual Is Organized....................... 1 IMPORTANT CAUTIONS........................1 Table of Contents ......................2 Getting Started ......................3 Accessories .............................. 3 Set the VOLTAGE SELECTOR Switch ....................3 How To Put Batteries In the Remote Control..................3 Using the Remote Control ........................ -
Página 6: Getting Started
Getting Started Accessories Make sure that you have all of the following items, which are supplied with the System. AM Loop Antenna (1) FM Wire Antenna (1) Remote Control (1) Batteries (2) AC Plug Adaptor (1) If any of these items are missing, contact your dealer immediately. Set the VOLTAGE SELECTOR Switch To avoid damaging the System, set the voltage before plugging in the System. -
Página 7: Using The Remote Control
Getting Started Using the Remote Control The Remote Control makes it easy to use many of the functions of the System from a distance of up to 7m away. You need to point the Remote Control at the remote sensor on the System’s front panel. Remote sensor CAUTION: •... -
Página 8: Connecting The Am Antenna
Getting Started Connecting the AM Antenna Rear Panel of the Unit AM antenna wire (not supplied) If reception is poor, connect the outside antenna. Turn the loop until you have the best reception. AM loop antenna (Supplied) Attach the AM loop to its base by snapping the tabs on the loop into the slot in the base. -
Página 9: Connecting External Equipment
COMPU Play JVC’s COMPU PLAY feature lets you control the most frequently used System functions with a single touch. With One Touch Operation you can play a CD, a tape, turn on the radio, or listen to an external equipment with a single press of the play button for that function. -
Página 10: Basic Operations
Basic Operations STANDBY/ON STANDBY/ON SLEEP Display Numeric RHYTHM AX keys indicator FM /AM FM MODE SOUND MODE RHYTHM AX VOLUME STANDBY/ON PHONES STANDBY indicator REPEAT PROGRAM /RANDOM TAPE TAPE SOUND VOLUME MODE SOUND VOLUME +, – FADE MODE RHYTHM AX MUTING FADE MUTING RHYTHM... -
Página 11: Fade-Out Muting (Fade Muting)
Basic Operations Fade-out Muting (FADE MUTING) Entering the Number with the Remote Control (Numeric Keys) You can mute the output with one touch operation. You will use the number keys on the Remote Control to enter num- To muting the output, press the FADE MUTING button on the bers for presetting stations, recalling the preset stations, or pro- Remote Control. -
Página 12: Using The Tuner
Using the Tuner STANDBY/ON SLEEP Numeric keys FM /AM FM MODE FM/AM FM MODE FM/AM Á ¢ REPEAT PROGRAM /RANDOM TAPE TAPE Á SOUND VOLUME MODE FADE MUTING RHYTHM AX REMOTE CONTROL Band display, Frequency display, Preset channel FM mode indicators * When the System is in use, the display shows other items as well. -
Página 13: Presetting Stations
Using the Tuner Using the Unit Select a station using one of the following methods. Select a band by pressing the FM/AM button. • Manual Tuning Á Press the button to tune in a sta- Briefly press the 22 or Á button to move from frequency tion. -
Página 14: Using The Cd Player
Using the CD Player REPEAT PROGRAM STANDBY/ON RANDOM Numeric CD Open/ keys SLEEP Close 0 DISC SKIP CD 6 FM /AM FM MODE ¢ CANCEL CD1-CD3 CD1-CD3 CD 6 ¢ REPEAT PROGRAM /RANDOM TAPE TAPE Á REPEAT PROGRAM SOUND VOLUME MODE /RANDOM FADE... -
Página 15: To Load Cds
Using the CD Player ❏ When you use an 8 cm CD, place it on the inner circle of the tray. About Disc Indicator: ❏ You can load CDs while listening to the other source or while Disc Rotation Disc Number listening to the CD being played back. -
Página 16: Basics Of Using The Cd Player-Normal Play
Using the CD Player GROUP mode Basics of Using the CD Player- Normal Play Total track number To Play CDs Total group number To pause, press the CD 6 button. The playing time indication Load CDs. blinks on the display. To cancel pause, press the CD 6 button again. -
Página 17: Programming The Playing Order Of The Tracks
Using the CD Player Using the Remote Control Programming the Playing Order Press the numeric keys to directly enter the track number. Then, the program order number will be assigned from P-1. of the Tracks • To delete the current program step, press the CANCEL button on the Unit. -
Página 18: Random Play
Using the CD Player Random Play Tray Lock Function The tracks of the selected CD will play in no special order when In order to safely keep the CD in the CD Player, the tray can be you use this mode. electronically locked. -
Página 19: Using The Cassette Deck (Listening To A Tape)
Using the Cassette Deck (Listening to a Tape) STANDBY/ON SLEEP TAPE A 3 TAPE B 3 FM /AM FM MODE ¢ 0 PUSH OPEN REPEAT PROGRAM /RANDOM 0 PUSH OPEN TAPE TAPE (Deck B) TAPE B 3 (Deck A) TAPE A 3 Á... -
Página 20: Using The Cassette Deck (Recording)
Using the Cassette Deck (Recording) STANDBY/ON REC START/STOP CD REC START SLEEP PROGRAM DUBBING FM /AM FM MODE TAPE B 3 TAPE A 3 0 PUSH OPEN 0 PUSH OPEN REPEAT PROGRAM /RANDOM TAPE TAPE (Deck A) (Deck B) TAPE A 3 TAPE B 3 SOUND VOLUME... -
Página 21: Standard Recording
Using the Cassette Deck (Recording) Insert a blank or erasable tape into the Deck Standard Recording B and wind past the tape leader. Press the CD REC START button on the Unit. This is the basic method for recording any source. The System also “CD REC”... -
Página 22: Using An External Equipment
Using an External Equipment STANDBY/ON SLEEP FM /AM FM MODE AUX jack REPEAT PROGRAM /RANDOM TAPE TAPE SOUND VOLUME MODE FADE MUTING RHYTHM AX REMOTE CONTROL Listening to the External Equipment You can listen to the external equipment such as portable CD, MD player, STB, or other auxiliary. -
Página 23: Using The Timers
Using the Timers STANDBY/ON SLEEP SLEEP FM /AM FM MODE CLOCK/TIMER ¢ REPEAT PROGRAM /RANDOM TAPE TAPE SOUND VOLUME MODE FADE RHYTHM AX MUTING REMOTE CONTROL DAILY Timer indicator SLEEP indicator REC (Recording) Timer indicator Timer indicator * When the System is in use, the display shows other items as well. For simplicity, we show here only the items described in this section. -
Página 24: Setting The Daily Timer
Using the Timers 2. Press the ¢ or 4 button to set the minute, then press the Setting the Daily Timer SET button. Once you have set the Daily Timer, the timer will be activated at the same time every day. The Timer indicator ( ) and “DAILY”... -
Página 25: Setting The Rec (Recording) Timer
Using the Timers Preparation for each music source: Turning the Daily Timer On and Off Perform the following operation according to the music source Once you have set the Daily Timer, it is stored in memory. So, the you have selected. Then, the System enters Volume Setting Daily Timer will be activated at the same time every day until it is mode. - Página 26 Using the Timers Using the Unit Press the STANDBY/ON button to turn You can set the time in the same way as for setting the Daily Tim- off the System, if necessary. The Timer indicator ( ) and “REC” indicator are lit on the Insert a blank or erasable tape into the Deck display, showing that the Rec Timer is set to on.
-
Página 27: Setting The Sleep Timer
Using the Timers Setting the SLEEP Timer Timer Priority Use the Sleep Timer to turn the System off after a certain number Since REC Timer and DAILY Timer can be set independently, you of minutes when it is playing. By setting the Sleep Timer, you can may wonder what happens if the settings overlap. -
Página 28: Care And Maintenance
Care And Maintenance Handle your CDs and tapes carefully, and they will last a long Cassette Tapes time. • If the tape is loose in its cassette, take up Compact Discs the slack by inserting a pencil in one of the reels and rotating. -
Página 29: Troubleshooting
Troubleshooting • If you are having a problem with your System, check this list for a possible solution before calling for service. • If you cannot solve the problem from the hints given here, or the System has been physically damaged, call a qualified person, such as your dealer, for service. -
Página 30: Introducción
❏ Los mandos y las funciones han sido rediseñados para que resulten muy fáciles de utilizar y pueda dedicarse sólo a disfrutar de la música. • El sistema COMPU PLAY de JVC permite poner en marcha el equipo y escuchar automáticamente la radio, la platina de casete o el reproductor de CD pulsando un solo botón. -
Página 31: Índice
Índice Introducción........................1 Características............................1 Cómo está organizado este manual ......................1 PRECAUCIONES IMPORTANTES ...................... 1 Índice ..........................2 Cómo empezar.......................3 Accesorios ............................... 3 Ajuste del interruptor VOLTAGE SELECTOR..................3 Cómo colocar las pilas en el mando a distancia ..................3 Uso del mando a distancia ........................4 Conexión de la antena FM........................ -
Página 32: Cómo Empezar
Cómo empezar Accesorios Asegúrese de que tiene todos los elementos siguientes, suministrados con el sistema. Antena de cuadro para AM (1) Mando a distancia (1) Pilas (2) Antena monofilar de FM (1) Adaptador de enchufe de CA (1) Si faltara alguno de estos artículos, contacte de inmediato con su proveedor. Ajuste del interruptor VOLTAGE SELECTOR Para evitar que se pueda dañar el sistema, ajuste el voltaje antes de enchufar el sistema. -
Página 33: Uso Del Mando A Distancia
Cómo empezar Uso del mando a distancia Con el mando a distancia podrá controlar fácilmente numerosas funciones desde una distancia de hasta 7 m. Debe apuntar el mando a distancia hacia el sensor remoto del panel frontal del sistema. Sensor remoto PRECAUCIÓN: •... -
Página 34: Conexión De La Antena De Am
Cómo empezar Conexión de la antena de AM Panel posterior del sistema Antena de AM (no incluida) Si la recepción es pobre, utilice la antena exterior. Gire la antena de cuadro hasta obtener la mejor recepción. Antena de cuadro para AM (incluida) Fije la antena de cuadro AM a la base introduciendo las pes-... -
Página 35: Conexión De Equipos Auxiliares
COMPU Play La función COMPU PLAY de JVC le permite controlar las funciones más frecuentes utilizadas en el sistema con un simple botón. Con el sistema de un solo botón puede reproducir un CD, una cinta, encender la radio o escuchar un equipo auxiliar con sólo pulsar el botón Play de la función. -
Página 36: Funciones Básicas
Funciones básicas STANDBY/ON STANDBY/ON SLEEP Teclas Pantalla numéricas Indicador RHYTHM AX SOUND FM /AM FM MODE MODE RHYTHM AX VOLUME STANDBY/ON Auriculares (PHONES) Indicador de modo de REPEAT PROGRAM /RANDOM espera (STANDBY) TAPE TAPE SOUND VOLUME MODE SOUND VOLUMEN +, – FADE MODE RHYTHM AX... -
Página 37: Silenciamiento Progresivo (Fade Muting)
Funciones básicas Silenciamiento progresivo (FADE Introducción de un número con MUTING) el mando a distancia (teclas nu- méricas) Si lo desea, puede hacer que el sonido se detenga progresivamente pulsando un único botón. Las teclas numéricas del mando a distancia permiten seleccionar un número para memorizar una emisora, sintonizar una emisora pre- Para activar esta función, pulse el botón FADE MUTING del sintonizada o programar las pistas que desea reproducir de un CD. -
Página 38: Uso Del Sintonizador
Uso del sintonizador STANDBY/ON SLEEP Teclas numéricas FM /AM FM MODE FM/AM FM MODE FM/AM Á ¢ REPEAT PROGRAM /RANDOM TAPE TAPE Á SOUND VOLUME MODE FADE MUTING RHYTHM AX REMOTE CONTROL Indicador de banda, frecuencia y canal sintonizado Indicadores de modo FM * Cuando se utiliza el sistema, la pantalla también muestra otros datos. -
Página 39: Presintonía De Emisoras
Uso del sintonizador Ejemplo: Pulse el botón SET. Pulse el botón ¢ hasta que aparezca en la pantalla el nú- En la pantalla aparece durante 2 segundos el mensaje “STO- mero de presintonía “P12”. Entonces la pantalla mostrará la RED”, tras lo cual vuelven a aparecer indicadas la banda y la banda y la frecuencia de la presintonía. -
Página 40: Uso Del Reproductor De Cd
Uso del reproductor de CD REPEAT PROGRAM STANDBY/ON RANDOM Teclas Abrir/Cerrar CD0 numéricas SLEEP DISC SKIP CD 6 FM /AM FM MODE ¢ CANCEL CD1-CD3 CD1-CD3 ¢ CD 6 Á REPEAT PROGRAM /RANDOM TAPE TAPE REPEAT PROGRAM SOUND VOLUME MODE /RANDOM FADE RHYTHM AX... -
Página 41: Cómo Introducir Los Cd
Uso del reproductor de CD ❏ Si utiliza un CD de 8 cm, encájelo en el hueco interior de la ban- Acerca del indicador de disco: deja. Indicador del nú- Indicador de rota- ❏ Puede introducir los CD mientras se reproduce otra fuente de au- mero del disco ción del disco dio. -
Página 42: Instrucciones Básicas Para Utilizar El Reproductor De Cd: Reproducción Normal
Uso del reproductor de CD Modo GROUP Instrucciones básicas para uti- lizar el reproductor de CD: Re- producción Normal Cantidad total de pistas Número total, de grupos Para hacer una pausa, pulse el botón CD 6. El tiempo de Para reproducir los CD reproducción parpadea en la pantalla. -
Página 43: Programación Del Orden De Reproducción De Las Pistas
Uso del reproductor de CD Reproducción con búsqueda Seleccione la pista que quiera programar. Mantenga pulsados los botones siguientes durante la reproducción Desde el sistema para que el lector avance o retroceda rápidamente hasta que en- Seleccione la pista mientras parpadee la pantalla, pulsando los bo- cuentre el pasaje deseado en la pista del CD que esté... -
Página 44: Reproducción Aleatoria
Uso del reproductor de CD Para detener la reproducción, pulse el botón 7. También Para salir del programa y recuperarlo más tarde puede detenerla cambiando a otra fuente de audio (por ejemplo, al El programa creado se graba en la memoria. De este modo, si no sintonizador). -
Página 45: Uso De La Platina (Escuchar Una Cinta)
Uso de la platina (escuchar una cinta) STANDBY/ON SLEEP TAPE A 3 TAPE B 3 FM /AM FM MODE ¢ 0 PUSH OPEN REPEAT PROGRAM /RANDOM 0 PUSH OPEN TAPE TAPE TAPE B 3 (Platina B) (Platina A) TAPE A 3 Á... -
Página 46: Uso De La Platina (Grabación)
Uso de la platina (grabación) STANDBY/ON REC START/STOP CD REC START SLEEP PROGRAM Doblaje (DUBBING) FM /AM FM MODE TAPE B 3 TAPE A 3 0 PUSH OPEN 0 PUSH OPEN REPEAT PROGRAM /RANDOM TAPE TAPE (Platina B) (Platina A) TAPE A 3 TAPE B 3 SOUND... -
Página 47: Grabación Normal
Uso de la platina (grabación) • Si quiere grabar un CD solamente, sólo necesita cargar un Grabación Normal Inserte una cinta virgen o grabada que no le Por Grabación Normal nos referimos al método de grabación bási- importe borrar en la platina B y avance hasta ca de otras fuentes. -
Página 48: Uso De Equipos Auxiliares
Uso de equipos auxiliares STANDBY/ON SLEEP FM /AM FM MODE Toma AUX REPEAT PROGRAM /RANDOM TAPE TAPE SOUND VOLUME MODE FADE MUTING RHYTHM AX REMOTE CONTROL Cómo escuchar un equipo auxi- liar Puede escuchar la reproducción de un equipo externo como, por ejemplo, un reproductor de CD portátil, reproductor MD, STB u otro equipo auxiliar. -
Página 49: Uso De Los Temporizadores
Uso de los temporizadores STANDBY/ON SLEEP SLEEP FM /AM FM MODE CLOCK/TIMER ¢ REPEAT PROGRAM /RANDOM TAPE TAPE SOUND VOLUME MODE FADE RHYTHM AX MUTING Indicador del temporizador diario (DAILY) REMOTE CONTROL Indicador del temporizador de desco- nexíón automática (SLEEP) Indicador del temporizador de grabación (REC) Indicador del temporizador... -
Página 50: Ajuste Del Temporizador Diario (Daily)
Uso de los temporizadores 2. Pulse los botones ¢ o 4 del sistema para seleccionar Ajuste del temporizador diario los minutos a los que quiere que se ponga en marcha; a con- tinuación, pulse el botón SET. (DAILY) Una vez haya ajustado el temporizador diario (DAILY), éste se ac- tivará... -
Página 51: Ajuste Del Temporizador De Grabación (Rec)
Uso de los temporizadores Preparación de las distintas fuentes de audio: Cómo activar y desactivar el temporizador diario Siga el paso que corresponda según la fuente de audio que (DAILY) haya seleccionado. Luego, el sistema le permitirá ajustar el ni- Una vez haya ajustado el temporizador diario (DAILY), éste queda re- vel del volumen. -
Página 52: Cómo Activar Y Desactivar El Temporizador De Grabación (Rec)
Uso de los temporizadores Desde el sistema Pulse el botón SET. Ajuste la hora siguiendo el mismo procedimiento que para el tem- El ajuste del temporizador se completa y la pantalla vuelve a porizador diario (DAILY). ser la anterior al ajuste del temporizador. Inserte una cinta virgen o grabada que no le Pulse el botón STANDBY/ON para apa-... -
Página 53: Ajuste Del Temporizador De Desconexión Automática (Sleep)
Uso de los temporizadores Ajuste del temporizador de des- Prioridad de los temporizadores conexión automática (SLEEP) Como el temporizador REC y el temporizador DAILY pueden ajustarse independientemente, tal vez se pregunte usted qué pasará Utilice el temporizador de des conexión automática (SLEEP) para si sus ajustes coinciden. -
Página 54: Cuidado Y Mantenimiento
Cuidado y mantenimiento Si trata sus CD y cintas con cuidado, durarán mucho tiempo. Cintas de casete Discos compactos • Para tensar la cinta de los casetes, inserte un lápiz en una de las bobinas y gírelo • Extraiga los discos de su caja sostenién- en la dirección adecuada. -
Página 55: Solución De Problemas
Solución de problemas • Si tiene problemas con el equipo, compruebe en esta lista la posible solución antes de acudir al servicio técnico. • Si no puede solucionar el problema o si el sistema se ha dañado físicamente, póngase en contacto con un técnico cualificado, como por ejemplo su distribuidor oficial, para que lleve a cabo la reparación. -
Página 56: Introdução
❏ Os controles e operações foram redesenhados para os fazer muito fáceis de usar, deixando você livre para apreciar a música. • Com o COMPU PLAY da JVC você pode ligar o aparelho e com um só toque você liga automaticamente o Rádio, o Toca-fitas, ou o CD Player. - Página 57 Conteúdo Introdução........................1 Funções..............................1 Como Está Este Manual Organizado...................... 1 Precauções Importantes .......................... 1 Conteúdo........................2 Iniciando........................3 Acessórios............................... 3 Ajuste o interruptor VOLTAGE SELECTOR..................3 Como Colocar as Pilhas no Controle Remoto ..................3 Usando o Controle Remoto ........................4 Ligando a Antena de FM.
-
Página 58: Iniciando
Iniciando Acessórios Verifique se você tem todos os itens abaixo, que são fornecidos com o aparelho. Antena de Quadro AM (1) Controle Remoto (1) Pilhas (2) Antena de Arame FM (1) Adaptador de Plugue CA (1) Se você verificar que algum desses itens está faltando, entre em contato com seu fornecedor imediatamente. Ajuste o interruptor VOLTAGE SELECTOR Para evitar possíveis danos ao seu aparelho, escolha a voltagem antes de ligá-lo à... -
Página 59: Usando O Controle Remoto
Iniciando Usando o Controle Remoto O Controle Remoto facilita o manuseio e operação de muitas das diversas funções de seu aparelho, a uma distância de até 7 metros. Basta você apontar o Controle Remoto para o sensor localizado no painel frontal de seu aparelho. Sensor remoto CUIDADO: •... -
Página 60: Ligando A Antena De Am
Iniciando Ligando a Antena de AM Painel Traseiro do Aparelho Antena de arame AM (não incluída) Se a recepção for deficiente, conecte a antena externa. Gire o quadro até conseguir uma boa recepção. Antena de Quadro AM (incluída) Prenda a antena de quadro AM na base, introduzindo e apertando as lingüetas no quadro no espaço próprio na base. -
Página 61: Conectando Equipamento Externo
COMPU Play A função COMPU PLAY da JVC lhe vai permitir controlar as funções mais freqüentemente usadas no aparelho somente com um toque. Com a Operação Um Toque você vai poder ouvir um CD, uma cassete, ligar o rádio, ou ouvir qualquer outro equipamento externo, apenas pressionando o botão play para essa função. -
Página 62: Operações Básicas
Operações Básicas STANDBY/ON STANDBY/ON % SLEEP Mostrador Teclas Indicador de numéricas RHYTHM AX SOUND FM /AM FM MODE MODE RHYTHM AX VOLUME % STANDBY/ON PHONES Indicador de STANDBY REPEAT PROGRAM /RANDOM TAPE TAPE SOUND VOLUME MODE SOUND VOLUME +, – MODE FADE MUTING... -
Página 63: Cortando O Volume De Som (Fade Muting)
Operações Básicas Para ouvir em privado Selecionar o Modo de Som Conecte um par de fones de ouvido à tomada correspondente de (SOUND MODE) PHONES (Fones). Os alto-falantes ficarão sem emitir som. Se lembre de diminuir o volume antes de ligar ou usar os fones de ouvido. -
Página 64: Usando O Rádio
Usando o Rádio STANDBY/ON SLEEP Teclas numéricas FM /AM FM MODE FM/AM FM MODE FM/AM Á ¢ REPEAT PROGRAM /RANDOM Á TAPE TAPE SOUND VOLUME MODE FADE RHYTHM AX MUTING REMOTE CONTROL Mostrador de faixas, mostrador de freqüências, programar canais Indicadores do modo FM * Quando o aparelho estiver ligado, o mostrador também indicará... -
Página 65: Programando Estações
Usando o Rádio Selecione uma estação usando um dos seguintes métodos. TUNING PRESET • Sintonia Manual Pressione pouco tempo o botão 22 ou Á no aparelho para mudar de uma freqüência para outra, até você encontrar a estação desejada. FM=30, AM=15 Quando mudar de Faixa •... -
Página 66: Usando O Cd Player
Usando o CD Player REPEAT PROGRAM STANDBY/ON RANDOM 0 para Abrir/ Teclas SLEEP numéricas Fechar CD. CD 6 DISC SKIP FM /AM FM MODE ¢ CANCEL CD1-CD3 CD1-CD3 ¢ CD 6 REPEAT PROGRAM /RANDOM Á TAPE TAPE REPEAT PROGRAM SOUND VOLUME MODE /RANDOM... -
Página 67: Para Carregar Cds
Usando o CD Player ❏ Quando você usar um CD de 8 cm, o coloque no círculo interior Sobre o indicador de disco: da bandeja. Indicador de rotação Indicador do número ❏ Você pode colocar CDs enquanto estiver ouvindo música em do disco do disco qualquer outra função. -
Página 68: Regras Básicas Ao Usar Cd Player-Reprodução Normal
Usando o CD Player Modo GROUP Regras Básicas ao Usar CD Player-Reprodução Normal Número total de faixas Para Tocar CDs Número total de grupos Para uma pausa, pressione o botão CD 6. A indicação do Carregar CDs tempo de reprodução aparecerá piscando no mostrador. Para cancelar a pausa, pressione de novo o botão CD6. -
Página 69: Programar A Ordem De Tocar Das Faixas
Usando o CD Player O número de ordem do programa é atribuído a partir de P-1. Programar a Ordem de Tocar das Faixas Você pode programar a ordem de tocar as faixas em todos os CDs. Número de CD Número da faixa Mas note que você... -
Página 70: Random Play (Escolha Livre)
Usando o CD Player Para parar de tocar, pressione o botão 7. Se alterar para outra Para Sair e Entrar de Novo em Tocar Programa função (por exemplo sintonizador) também faz parar de tocar. O O programa que fez é guardado na memória. Por isso, pode sair modo de repetição é... -
Página 71: Usando O Toca-Fitas (Ouvir Uma Fita)
Usando o Toca-Fitas (Ouvir uma Fita) STANDBY/ON SLEEP TAPE A 3 TAPE B 3 FM /AM FM MODE ¢ 0 PUSH OPEN 0 PUSH OPEN REPEAT PROGRAM /RANDOM (ejetar fita B) (ejetar fita A) TAPE TAPE TAPE B 3 Á TAPE A 3 SOUND VOLUME... -
Página 72: Usando O Toca-Fitas (Gravar)
Usando o Toca-Fitas (Gravar) REC START/STOP STANDBY/ON CD REC START SLEEP PROGRAM DUBBING FM /AM FM MODE TAPE B 3 TAPE A 3 0 PUSH OPEN 0 PUSH OPEN REPEAT PROGRAM /RANDOM (ejetar fita A) (ejetar fita B) TAPE TAPE TAPE A 3 TAPE B 3 SOUND... -
Página 73: Gravar Estandard
Usando o Toca-Fitas (Gravar) Introduza uma fita em branco ou fita que pode Gravar Estandard apagar no toca-fitas B e enrole até passar a fita condutora. Este é o método básico para gravar qualquer fonte de som. O aparelho também tem maneiras especiais para gravar Cd para fita e de fita para fita, Pressione o botão CD REC START (Iniciar gravar que lhe poupa tempo e empenho, como também lhe disponibiliza alguns CD) no aparelho. -
Página 74: Usando Um Equipamento Externo
Usando um Equipamento Externo STANDBY/ON SLEEP FM /AM FM MODE Jaque AUX REPEAT PROGRAM /RANDOM TAPE TAPE SOUND VOLUME MODE FADE MUTING RHYTHM AX REMOTE CONTROL Ouvindo o Equipamento Externo Você pode escutar equipamentos externos como um CD portátil, MD player, STB, ou outro equipamento auxiliar. ❏... -
Página 75: Usando Os Timers
Usando os Timers STANDBY/ON SLEEP SLEEP FM /AM FM MODE CLOCK/TIMER ¢ REPEAT PROGRAM /RANDOM TAPE TAPE SOUND VOLUME MODE FADE RHYTHM AX MUTING REMOTE CONTROL Indicador do timer DIÁRIO (DAILY) Indicador de DESLIGAMENTO (SLEEP) Indicador do timer gravação (REC) Indicador do timer * Quando o aparelho estiver ligado, o mostrador também indicará... -
Página 76: Ajustando O Timer Diário
Usando os Timers 2. Pressione o botão ¢ ou 4 para acertar os minutos, Ajustando o Timer Diário depois pressione o botão SET. Uma vez que você tenha ajustado a data, o timer será ativado à mesma hora todos os dias. O indicador do Timer ( ) e o indicador “DAILY”... -
Página 77: Ajustando A Rec (Gravação) Timer
Usando os Timers Preparação para cada fonte de música: Ligando e Desligando o Timer Diário Efetue a seguinte operação de acordo com a fonte de música que Uma vez que tenha ajustado o timer diário, estes ajustes são selecionou. Depois, o aparelho entra no modo de ajuste de volume. guardados na memória. -
Página 78: Pressione Repetidamente O Botão Clock
Usando os Timers Usando o Aparelho Pressione o botão SET (Ajustar). Você pode ajustar o timer do mesmo modo que ajusta o Timer Diário. O ajuste do timer é finalizado e o mostrador retorna à exibição em que estava antes do ajuste do timer. Introduza uma fita em branco ou fita que pode apagar no toca-fitas B e enrole até... -
Página 79: Ajustando O Timer De Desligamento (Sleep)
Usando os Timers Ajustando o Timer de Prioridade do Timer Desligamento (SLEEP) Como o timer REC e o timer DILAY podem ser ajustados independentemente, você pode querer saber o que aconteceria se os Use o timer de desligamento para desligar o aparelho depois de a ajustes se sobrepusessem. -
Página 80: Cuidados E Manutenção
Cuidados e Manutenção Manuseie os CDs e fitas com cuidado, e eles durarão um longo Fitas Cassetes tempo. • Se a fita estiver solta na cassete, estique novamente a fita, introduza um lápis num dos rolos e rode. • Remova o CD da sua caixa segurando-o •... -
Página 81: Solução De Problemas
Solução de Problemas • Se você tem algum problema com seu aparelho, verifique esta lista para uma possível solução antes de ligar para a assistência técnica. • Se não puder resolver o problema ou se seu aparelho tiver sido fisicamente danificado, procure ajuda qualificada, como o seu revendedor, para executar o serviço. Sintoma Causa Possível Ação... - Página 82 Para el residente de Mexico IMPORTADOR : JVC DE MEXICO, S.A. DE C.V. AV. INSURGENTES SUR No.670 8º PISO COL. DEL VALLE, MEXICO, D.F. C.P.03100 Tel. 55 36 82 52 Fax.